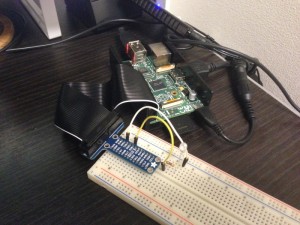
Raspberry Pi + OpenECHOでLチカ
ここ数日インフルエンザでぶっ倒れておりましたが、リハビリを兼ねて電子工作開始。
さて、自分のとりあえずの目標はRaspberry PiでOpenECHOを使えるようにすることです。その先にもう一個やりたいことがあるのだけれど、とりあえずはここまで。
前回、無事にRaspberry PiでのProcessing起動と、JavaでのGPIO制御ができるようになったので、あとはOpenECHO for Processingのライブラリを突っ込んでやるだけ。ライブラリはここからmasterのzipをとってきて、解凍した中のOpenECHO/OpenECHO for Processing/libraries/の中にある、controlP5ディレクトリとOpenECHOディレクトリを、前回のpi4jと同じように、各ユーザのsketchbook/librariesディレクトリにコピーする。今のところ、pi4jがrootになっていないとGPIO制御できないので、/root/sketchbook/libraries以下にコピーする。これで、/root/sketchbook/libraries以下には、pi4j, OpenECHO, controlP5の3つのライブラリ用ディレクトリが存在しているハズ。
続いて、Raspberry PiをOpenECHOのノードとしてECHONETに参加させるための、Processingのソースの作成。といっても、基本的に組み合わせるだけ。先ほど落としてきたOpenECHOのライブラリに含まれている、/OpenECHO/OpenECHO for Processing/libraries/OpenECHO/examples/Tutorial4_LightEmulator/Tutorial4_LightEmulator.pdeに、pi4jのLチカサンプルコードを組み合わせるだけです。
import java.io.IOException;
import processing.net.*;
import controlP5.*;

import com.sonycsl.echo.Echo;
import com.sonycsl.echo.node.EchoNode;
import com.sonycsl.echo.eoj.EchoObject;
import com.sonycsl.echo.EchoProperty;
import com.sonycsl.echo.eoj.profile.NodeProfile;
import com.sonycsl.echo.eoj.device.DeviceObject;
import com.sonycsl.echo.eoj.device.housingfacilities.GeneralLighting;
import com.sonycsl.echo.processing.defaults.DefaultNodeProfile;
import com.sonycsl.echo.processing.defaults.DefaultController;
import com.pi4j.io.gpio.GpioController;
import com.pi4j.io.gpio.GpioFactory;
import com.pi4j.io.gpio.GpioPinDigitalOutput;
import com.pi4j.io.gpio.PinState;
import com.pi4j.io.gpio.RaspiPin;

color backgroundLightOnColor = color(255, 204, 0);
color backgroundLightOffColor = color(0, 0, 0);
color backgroundNow = backgroundLightOffColor;

GpioController gpio;
GpioPinDigitalOutput lightPin;

public class LightEmulator extends GeneralLighting{
  byte[] mStatus = {0x31};
  byte[] mLocation = {(byte) 0x80};
  byte[] mFaultStatus = {0x42};
  byte[] mManufactureCode = {0x00, 0x00, 0x00};

  protected byte[] getOperationStatus() {
    return mStatus;
  }

  protected boolean setOperationStatus(byte[] edt) {
      mStatus[0] = edt[0];
      if(mStatus[0] == 0x30){
        backgroundNow = backgroundLightOnColor;
        lightPin.setState(PinState.HIGH);
      }else{
        backgroundNow = backgroundLightOffColor;
        lightPin.setState(PinState.LOW);
      }
      try{
        inform().reqInformOperationStatus().send();
      }catch(IOException e){
        e.printStackTrace();
      }
      return true;
  }

  protected boolean setInstallationLocation(byte[] edt) {
    mLocation[0] = edt[0];
    try{
      inform().reqInformInstallationLocation().send();
    }catch(IOException e){
      e.printStackTrace();
    }
    return true;
  }

  protected byte[] getInstallationLocation() {
    return mLocation;
  }

  protected byte[] getFaultStatus() {
    return mFaultStatus;
  }

  protected byte[] getManufacturerCode() {
    return mManufactureCode;
  }
}

// Use to create GUI
ControlP5 cp5;
LightEmulator lightEmu;

void setup(){
  // Set display window size
  size(400,400);
  frameRate(30);

  // Set OpenEcho
  try{
    lightEmu = new LightEmulator();
    Echo.start(new DefaultNodeProfile(), new DeviceObject[]{lightEmu});
  }catch(IOException e){
    e.printStackTrace();
  }

  Echo.addEventListener(new Echo.Logger(System.out));

  // Set pi4j
  gpio = GpioFactory.getInstance();
  lightPin = gpio.provisionDigitalOutputPin(RaspiPin.GPIO_01, "MyLED", PinState.LOW);
  lightPin.low();
} // End of setup()

void draw(){
  background(backgroundNow);
};
ブレッドボードとLEDの配線は、pi4jのLチカサンプルコードに記載のとおり。
最後に、照明(GeneralLighting)としてECHONETに参加したRaspberry Piをコントロールするために、PCをコントローラとしてECHONETに参加させるためのProcessingのソースを作成します。これも、ひょっとしたら/OpenECHO/OpenECHO for Processing/libraries/OpenECHO/examples/Tutorial4_LightEmulator/Tutorial4_LightEmulator.pdeがそのまま使えたのかもしれませんが、前に別に作っていたものを流用して作成。
import controlP5.*;

import com.sonycsl.echo.Echo;
import com.sonycsl.echo.node.EchoNode;
import com.sonycsl.echo.eoj.EchoObject;
import com.sonycsl.echo.EchoProperty;
import com.sonycsl.echo.eoj.profile.NodeProfile;
import com.sonycsl.echo.eoj.device.DeviceObject;
import com.sonycsl.echo.eoj.device.housingfacilities.GeneralLighting;

import com.sonycsl.echo.processing.defaults.DefaultNodeProfile;
import com.sonycsl.echo.processing.defaults.DefaultController;

// Use to create GUI
ControlP5 cp5;

// Set Appliace IP Address
final String targetIp = "192.168.24.210";

GeneralLighting myLight;

static final int GENERAL_LIGHTING = 0;

String[] applianceName = {
  "GeneralLighting"
};
int applianceNum = applianceName.length;
boolean applianceFound[] = {false};

String[] btFnName = {
  "searchAppliances",
  "lightOn",
  "lightOff"
};

String[] btLabel = {
  "Search Appliances",
  "GeneralLighting: ON",
  "GeneralLighting: OFF"
};

void setup(){
  // Set display window size
  size(400,400);
  frameRate(30);
  myDraw();

  // Set GUI
  textSize(12);
  cp5 = new  ControlP5(this);

  int btFnNum = btFnName.length;
  for(int i=0;i<btFnNum;i++){
    /* // Processing 2.1.1
    Button bt = cp5.addButton(btFnName[i])
                   .setCaptionLabel(btLabel[i])
                   .setSize(200,20)
                   .setPosition(0,120+30*i);
    */
    // Processing 2.0.3
    ControlP5 bt = new ControlP5(this);
    bt.addBang(btFnName[i], 0, 120+40*i, 100, 20);
    bt.controller(btFnName[i]).setLabel(btLabel[i]);
  }

  // Set OpenEcho
  try{
    Echo.start(new DefaultNodeProfile(), new DeviceObject[]{new DefaultController()});
  }catch(IOException e){
    e.printStackTrace();
  }

  Echo.addEventListener(new Echo.Logger(System.out));
  Echo.addEventListener(new Echo.EventListener(){

    public void onNewGeneralLighting(GeneralLighting device){
        super.onNewGeneralLighting(device);
        if(!device.getNode().getAddress().getHostAddress().equals(targetIp)){
          println("A GeneralLighting has found, but this is NOT yours.");
          return;
        }

        println("Your GneralLighting has Found!");
        applianceFound[GENERAL_LIGHTING] = true;
        myDraw();
        myLight = (GeneralLighting)device;

        device.setReceiver(new GeneralLighting.Receiver(){
          // Set Callback to get return values

          protected void onSetOperationStatus(EchoObject eoj, short tid, byte esv, EchoProperty property, boolean success){
            super.onSetOperationStatus(eoj, tid, esv, property, success);
            if(!success){
              println("error in call reqSetOperationStatus");
              println("setOperationStatus Param=" + toHexStr(property.edt));
              return;
            }
            showMessage("Success: onSetOperationStatus");
          }

          protected void onGetOperationStatus(EchoObject eoj, short tid, byte esv, EchoProperty property, boolean success){
            super.onGetOperationStatus(eoj, tid, esv, property, success);
            if(!success){
              showMessage("error in call reqGetOperationStatus");
              return;
            }
            showMessage("OperationStatus=" + toHexStr(property.edt));
          }
        }); // End of setReceiver
    } // End of onNewGeneralLighting
  }); // End of addEventListener

  // Search controllable appliances
  searchAppliances();

} // End of setup()

void draw(){

};

void myDraw(){
  background(0,0,0);
  for(int i=0;i<applianceNum;i++){
    if(applianceFound[i]){
      fill(0,255,0); // Green
      text(applianceName[i] + "  [FOUND!]", 0, 20+20*i);
    }else{
      fill(255,255,255); // white
      text(applianceName[i] + "  [NOT FOUND]", 0, 20+20*i);
    }
  }
}

public void searchAppliances(){
  println("----");
  try{
    // find other devices
    NodeProfile.getG().reqGetSelfNodeInstanceListS().send();

    println("Wait 3 seconds ...");
    try{
      Thread.sleep(3000);
    }catch(InterruptedException e){
      e.printStackTrace();
    }

    println("----");
    EchoNode[] nodes = Echo.getNodes();
    for(int i=0;i<nodes.length;i++){
      EchoNode en = nodes[i];
      println("node id=" + en.getAddress().getHostAddress());
      println("node profile=" + en.getNodeProfile());
      DeviceObject[] dos = en.getDevices();
      println("There are " + dos.length + " devices in this node");
      for(int j=0;j<dos.length;j++){
        DeviceObject d = dos[j];
        String typeName = d.getClass().getSuperclass().getSimpleName();
        println("device type = " + typeName);
      }
      println("----");
    }
  }catch(IOException e){
    e.printStackTrace();
  }
}

public void lightOn(){
  println("--lightOn--");
  if(applianceFound[GENERAL_LIGHTING]){
    try{
      myLight.set()
       .reqSetOperationStatus(new byte[]{0x30}) // Light ON
       .send();
    }catch(IOException e){
       e.printStackTrace();
    }
  }else{
    showMessage("There are NO your controllable GeneralLightings.");
  }
}

public void lightOff(){
  println("--lightOff--");
  if(applianceFound[GENERAL_LIGHTING]){
    try{
      myLight.set()
       .reqSetOperationStatus(new byte[]{0x31}) // Light OFF
       .send();
    }catch(IOException e){
       e.printStackTrace();
    }
  }else{
    showMessage("There are NO your controllable GeneralLightings.");
  }
}

String toHexStr(byte[] arg){
  String ret = "" ;
  for(int i=0;i<arg.length;++i){
    ret += Integer.toHexString(arg[i] & 0xff) + " ";
  }
  return ret;
}

void showMessage(String message){
   myDraw();
   fill(255,255,255); // white
   text(message, 0, 350);
   println(message);
}
targetIpの部分は、Raspberry Piの接続環境に応じて変更してください。
さて、これで準備完了。まず、Raspberry Piの方でGeneralLightingSample.pdeを(スーパーユーザ)で実行。続いて、同じローカルネット内のPCで、LightControlSample.pdeを実行。ProcessingのGUI上に”GeneralLighting [FOUND!]”と緑色で表示されていれば、Raspberry PiをECHONETのノードとして発見しており、制御可能な状態です。白色で”GeneralLighting [NOT FOUND”と表示されている場合は、”SEARCH APPLIANCES”ボタンを押してみてください。立ち上げ時にたまたま発見できなかった場合は、これで何度か手動で探しに行くことで見つかるハズです。それぞれ無事プログラムを起動できているにも関わらず、何度やっても見つからない場合は、PCとRaspberry Piの参加しているローカルネットが異なっている可能性があります。
さて、この状態になれば、後はPCのProcessing-GUI上のON/OFFボタンで、LEDのON/OFFができるようになっている…ハズ。自分の場合は、こんな感じになりました。
わかりにくくてすみませんが、マウスでGUIのON/OFF操作をしています。
さてさて、できたものはなんだかショボく見えるかもですが、ここまでできれば、あとはやる気次第でどうとでも拡張できるハズ。

ディスカッション
ピンバック & トラックバック一覧
[…] ということで、以前一度やっていますが、改めてRaspberry Pi B+をECHONET Lite機器として動作させてみます。前回はLチカで終わってしまったので、今回はほんのちょっとだけ進化させて、電気 […]