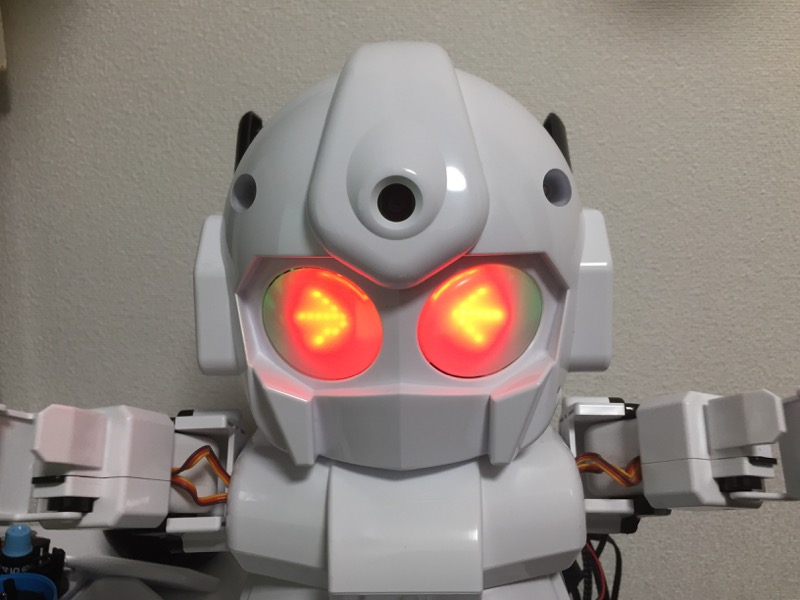
前回ラピロの動作を復活させることはできたので、次はラピロの表情(文字列表示含む)を復活させます。実質やることは、過去にやった2つの内容の再検証です。
とりあえずハードウェアの接続から見ていきます。
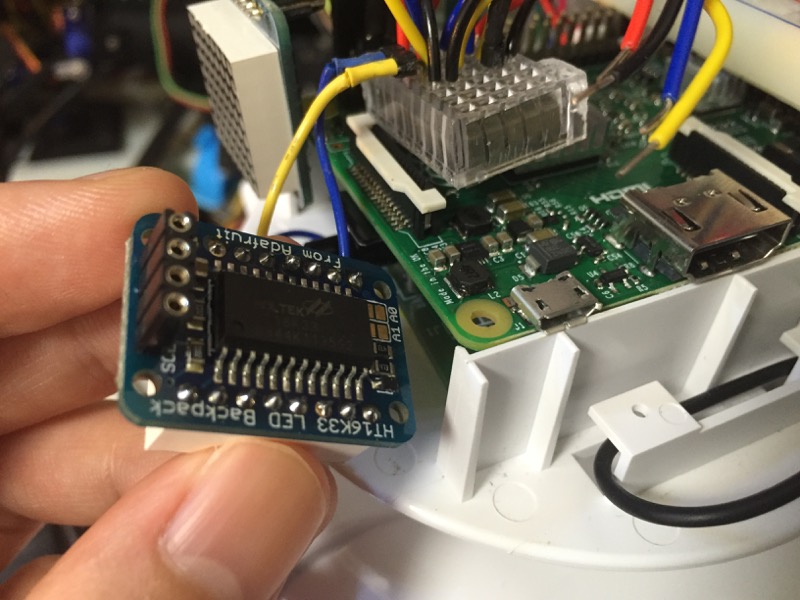
使用するのは以下のI2C接続8×8 LEDマトリックス2個です。
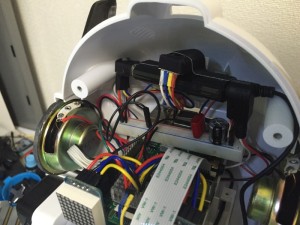
これをラピロの頭の中のRaspberry Piと接続しつつ、ちゃんと目の位置に固定してやる必要があります。

以前に3Dプリンタで作った固定具を使って固定した時は、微妙に頭が閉じ切らない結果になってしまったので、今回は固定方法を少し見直したいと思います。
手探りで色々位置合わせしてみたところ、わざわざ3Dプリンタで固定具を作らなくても、元々LEDマトリックス基盤に空いている穴に合わせてラピロのRaspberry Piの台座に穴を開けてやればネジで固定できそうなことがわかりました。

少しでも厚みが増えるのを防ぐため、基盤のチップ抵抗が干渉しそうな部分をニッパでカットしておきます。

位置合わせをして、ドリルで穴空け。

ネジを差し込みます。反対側の方はナットをつけることで、ICとナットで軽くRaspberry Pi基盤を挟む形になります。
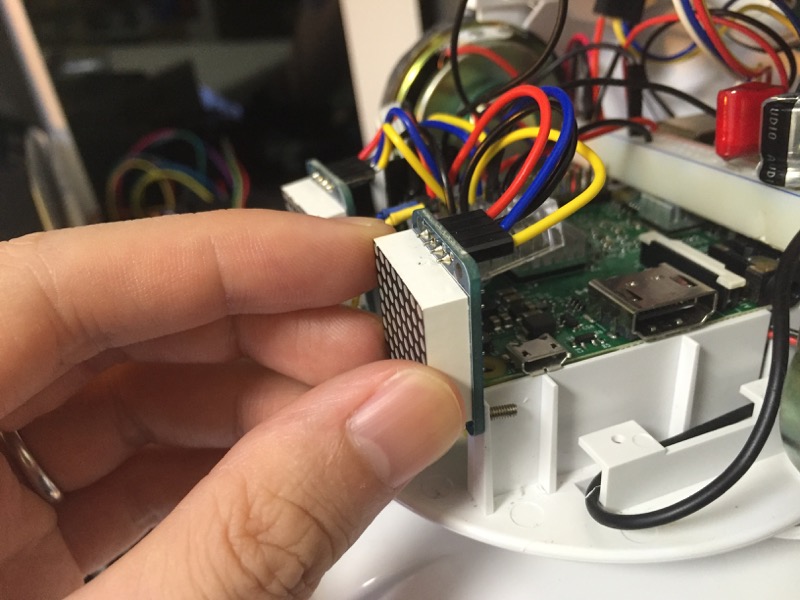
穴を開けた方にもナットをつければよりしっかり固定できるのですが、ちょっとスペースが足りないのでとりあえず差し込むだけにしておきました。まあ、最終的にラピロの眼で前から抑えられることになりますし。

逆サイドも同じように固定しました。
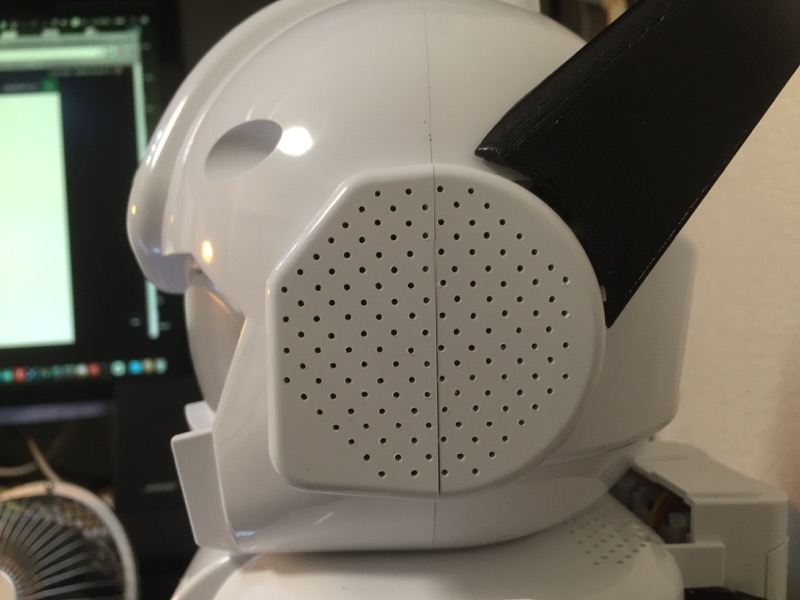
今回は3Dプリンタの固定具の厚みがない分、しっかりと頭を閉じることができました。
なお、今回はI2Cの配線とかアドレス変更については省略しているので、それについては過去の記事をご参照ください。
さて、以上でハード側の準備は終わったので、続いてソフト側の準備です。以前にI2C関連のツールをインストールしていない場合は、ここで入れておきます。
$ sudo apt-get install i2c-tools
$ sudo apt-get install python-smbus
インストールできたら、I2Cで接続できているかを確認します。
$ sudo i2cdetect -y 1
0 1 2 3 4 5 6 7 8 9 a b c d e f
00: -- -- -- -- -- -- -- -- -- -- -- -- --
10: -- -- -- -- -- -- -- -- -- -- -- -- -- -- -- --
20: -- -- -- -- -- -- -- -- -- -- -- -- -- -- -- --
30: -- -- -- -- -- -- -- -- -- -- -- -- -- -- -- --
40: -- -- -- -- -- -- -- -- -- -- -- -- -- -- -- --
50: -- -- -- -- -- -- -- -- -- -- -- -- -- -- -- --
60: -- -- -- -- -- -- -- -- -- -- -- -- -- -- -- --
70: 70 71 -- -- -- -- -- --
今の所繋いでいるのはこの2つだけなので、問題なしです。
続いて、Pythonでの制御に必要なライブラリを以下から持ってきます。
初めに書いてあるとおり、”build-essential”, “python-dev”, “python-smbus”, “python-imaging”, “git” の5つのパッケージが必要とのことなので、”$ dpkg -l”でインストール済みのパッケージを確認し、不足分をインストールします。自分の場合は”python-dev”と”python-imaging”が不足していました。
$ sudo apt-get install -y python-dev python-imaging準備ができたら、必要なライブラリをインストールします。
$ cd
$ git clone https://github.com/adafruit/Adafruit_Python_LED_Backpack.git
$ cd Adafruit_Python_LED_Backpack
$ sudo python setup.py install普通に使う分ならこれで準備OKですが、自分のように「複数のLEDマトリックスにまたがってスクロール表示させたい」というような場合には、先ほどインストールしたライブラリに少し手を加えてから再インストールする必要があります。具体的には、”Adafruit_Python_LED_Backpack/Adafruit_LED_Backpack/Matrix8x8.py”の中のMatrix8x8クラスの中に、以下の関数を追加します。
def horizontal_multi_scroll(self, image, total=1, number=0):
    image_list = list()
    width = image.size[0]

    for x in range(8 * number):
        display_section = self.create_blank_image()
        image_list.append(display_section)

    # Scroll into the blank image.
    for x in range(8):
        section = image.crop((0, 0, x, 8))
        display_section = self.create_blank_image()
        display_section.paste(section, (8 - x, 0, 8, 8))
        image_list.append(display_section)

    #Scroll across the input image.
    for x in range(8, width + 1):
        section = image.crop((x - 8, 0, x, 8))
        display_section = self.create_blank_image()
        display_section.paste(section, (0, 0, 8, 8))
        image_list.append(display_section)

    #Scroll out, leaving the blank image.
    for x in range(width - 7, width + 1):
        section = image.crop((x, 0, width, 8))
        display_section = self.create_blank_image()
        display_section.paste(section, (0, 0, 7 - (x - (width - 7)), 8))
        image_list.append(display_section)

    for x in range(8 * (total - (number + 1))):
        display_section = self.create_blank_image()
        image_list.append(display_section)

    #Return the list of images created
    return image_list
元々ライブラリに記載されている”horizontal_scroll()”関数にちょっと手を加えたものです。利用するLEDマトリックス基板の数(total)と、向かって右から何番目の基板であるか(number, 0スタート)を引数に与えることで、各マトリックス基板ごとに、文字列を流す前後に追加する空白画像の数を調整します。これで、複数のLEDマトリックスを同時に再生開始すると、文字が流れるように表示されます。
追加したら、ライブラリを再インストールします。
$ cd ~/Adafruit_Python_LED_Backpack
$ sudo python setup.py installさらに日本語を表示させるための準備として、8×8ドットの日本語フォント「美咲フォント」(TrueTyp形式)をダウンロードしてきます。
$ cd
$ mkdir fonts
$ cd fonts
$ wget http://www.geocities.jp/littlimi/arc/misaki/misaki_ttf_2015-04-10.zip
$ unzip misaki_ttf_2015-04-10.zip
以上で全ての準備は完了です。
ではでは、ラピロの表情づけから文字列スクロール表示までをテストするサンプルプログラムを作ってみます。
# -*- coding: utf-8 -*-
import time

import Image
import ImageDraw
import ImageFont

from Adafruit_LED_Backpack import Matrix8x8

def show_emotion(image_0, image_1):
    display_0.clear()
    display_1.clear()
    display_0.set_image(image_0)
    display_1.set_image(image_1)
    display_0.write_display()
    display_1.write_display()

def emotion_normal():
    image_0 = Image.new('1', (8, 8))
    image_1 = Image.new('1', (8, 8))
    draw_0 = ImageDraw.Draw(image_0)
    draw_1 = ImageDraw.Draw(image_1)
    draw_0.line((2,3,2,6), fill=255)
    draw_0.line((3,2,3,7), fill=255)
    draw_0.line((4,3,4,6), fill=255)
    draw_1.line((5,3,5,6), fill=255)
    draw_1.line((4,2,4,7), fill=255)
    draw_1.line((3,3,3,6), fill=255)
    show_emotion(image_0, image_1)

def emotion_silent():
    image_0 = Image.new('1', (8, 8))
    draw_0 = ImageDraw.Draw(image_0)
    draw_0.line((0,4,7,4), fill=255)
    show_emotion(image_0, image_0)

display_0 = Matrix8x8.Matrix8x8(address=0x70, busnum=1)
display_1 = Matrix8x8.Matrix8x8(address=0x71, busnum=1)

display_0.begin()
display_1.begin()

display_0.clear()
display_1.clear()

motion_silent()
time.sleep(2)
emotion_normal()
time.sleep(0.3)
emotion_silent()
time.sleep(0.3)
emotion_normal()
time.sleep(0.3)
emotion_silent()
time.sleep(0.3)
emotion_normal()
time.sleep(3)

text = u"OK! わかった! 了解!"
text_len = len(text)
image = Image.new('1', (text_len*8, 8))
draw = ImageDraw.Draw(image)
font = ImageFont.truetype("/home/pi/fonts/misaki_gothic.ttf", 8, encoding='unic')
draw.text((0,1), text, font=font, fill=255)

image_list_0 = display_0.horizontal_multi_scroll(image, 2, 0)
image_list_1 = display_1.horizontal_multi_scroll(image, 2, 1)

max_images = len(image_list_0)

for i in range(0, max_images):
    display_0.set_image(image_list_0[i])
    display_1.set_image(image_list_1[i])
    display_0.write_display()
    display_1.write_display()
    time.sleep(0.10)
実行してみましょう。こんな感じになります。
$ python matrix8x8_scroll_sample.pyビデオで撮るとどうしても光がモヤっとしてしまいますが、実際はもう少し見やすいです。
というわけで、初めてLEDマトリックスを扱った時はだいぶ試行錯誤してしまいましたが、ポイントだけ絞ってやると、スクロール表示とかも意外と簡単にできます。
最後に、せっかくなので、前回作成したWebサーバにこの表情変化のソースも加えておきます。これによって、ブラウザ上から”http://192.168.24.xxx:10080/v1/robots/rapiro/control/face?value=happy”のようにアクセスすることで、ラピロの表情を色々変化させることができるようになります。
# -*- coding: utf-8 -*-
from bottle import route, run, request, response, hook
import serial
import time
import json
import Image
import ImageDraw
import ImageFont

from Adafruit_LED_Backpack import Matrix8x8

com = serial.Serial(' /dev/ttyAMA0', 57600, timeout=10)

@hook('after_request')
def header_json():
    response.content_type = 'application/json'

#############################################################

def control_response_json(value):
    obj = {'control': value}
    return json.dumps(obj)

@route('/v1/robots/rapiro/control/power')
def control_power():
    status = request.query.status
    if status == 'off':
        com.write('#S')
    elif status == 'on':
        com.write('#D')
    return control_response_json("power")

@route('/v1/robots/rapiro/control/init')
def control_init():
    com.write("#M0")
    time.sleep(2)
    com.write("#PR000G000B000T010")
    time.sleep(1)
    com.write('#S')
    emotion_none()
    return control_response_json("init")

@route('/v1/robots/rapiro/control/stop')
def control_stop():
    com.write("#M0")
    return control_response_json("stop")

@route('/v1/robots/rapiro/control/forward')
def control_forward():
    com.write("#M1")
    return control_response_json("forward")

@route('/v1/robots/rapiro/control/back')
def control_back():
    com.write("#M2")
    return control_response_json("back")

@route('/v1/robots/rapiro/control/right')
def control_right():
    com.write("#M4")
    return control_response_json("right")

@route('/v1/robots/rapiro/control/left')
def control_left():
    com.write("#M3")
    return control_response_json("left")

@route('/v1/robots/rapiro/control/banzai')
def control_banzai():
    com.write("#M5")
    return control_response_json("banzai")

@route('/v1/robots/rapiro/control/head')
def control_head():
    value = request.query.value
    command = "#PS00A" + value.zfill(3) + "T005"
    com.write(command)
    return control_response_json("head")

@route('/v1/robots/rapiro/control/left_hand')
def control_left_hand():
    value = request.query.value
    command = "#PS07A" + value.zfill(3) + "T005"
    com.write(command)
    return control_response_json("left_hand")

@route('/v1/robots/rapiro/control/right_hand')
def control_right_hand():
    value = request.query.value
    command = "#PS04A" + value.zfill(3) + "T005"
    com.write(command)
    return control_response_json("right_hand")

@route('/v1/robots/rapiro/control/left_shoulder')
def control_left_shoulder():
    value = request.query.value
    command = "#PS05A" + value.zfill(3) + "T005"
    com.write(command)
    return control_response_json("left_shoulder")

@route('/v1/robots/rapiro/control/right_shoulder')
def control_right_shoulder():
    value = request.query.value
    com.write("#PR000G000B000T010")
    command = "#PS02A" + value.zfill(3) + "T005"
    com.write(command)
    return control_response_json("right_shoulder")

#############################################################

def show_text(text, delay):
    display_0.clear()
    display_1.clear()

    text_len = len(text)
    image = Image.new('1', (text_len * 8, 8))
    draw = ImageDraw.Draw(image)
    font = ImageFont.truetype("/home/pi/fonts/misaki_gothic.ttf", 8, encoding='unic')
    draw.text((0, 1), text, font=font, fill=255)

    image_list_0 = display_0.horizontal_multi_scroll(image, 3, 0)
    image_list_1 = display_1.horizontal_multi_scroll(image, 3, 2)

    max_images = len(image_list_0)

    for i in range(0, max_images):
        display_0.set_image(image_list_0[i])
        display_1.set_image(image_list_1[i])
        display_0.write_display()
        display_1.write_display()
        time.sleep(delay)

def emotion_surprise_text():
    text = u'何…だと…!?'
    show_text(text, 0.02)

def show_emotion(image_0, image_1):
    display_0.clear()
    display_1.clear()
    display_0.set_image(image_0)
    display_1.set_image(image_1)
    display_0.write_display()
    display_1.write_display()

def emotion_none():
    display_0.clear()
    display_1.clear()
    display_0.write_display()
    display_1.write_display()

def emotion_normal():
    image_0 = Image.new('1', (8, 8))
    image_1 = Image.new('1', (8, 8))
    draw_0 = ImageDraw.Draw(image_0)
    draw_1 = ImageDraw.Draw(image_1)
    draw_0.line((2,3,2,6), fill=255)
    draw_0.line((3,2,3,7), fill=255)
    draw_0.line((4,3,4,6), fill=255)
    draw_1.line((5,3,5,6), fill=255)
    draw_1.line((4,2,4,7), fill=255)
    draw_1.line((3,3,3,6), fill=255)
    show_emotion(image_0, image_1)

def emotion_happy():
    image_0 = Image.new(‘1’, (8, 8))
    image_1 = Image.new(‘1’, (8, 8))
    draw_0 = ImageDraw.Draw(image_0)
    draw_1 = ImageDraw.Draw(image_1)
    draw_0.line((0,5,0,6), fill=255)
    draw_0.line((1,4,1,4), fill=255)
    draw_0.line((2,3,4,3), fill=255)
    draw_0.line((5,4,5,4), fill=255)
    draw_0.line((6,5,6,6), fill=255)
    draw_1.line((1,5,1,6), fill=255)
    draw_1.line((2,4,2,4), fill=255)
    draw_1.line((3,3,5,3), fill=255)
    draw_1.line((6,4,6,4), fill=255)
    draw_1.line((7,5,7,6), fill=255)
    show_emotion(image_0, image_1)

def emotion_angry():
    image_0 = Image.new(‘1’, (8, 8))
    image_1 = Image.new(‘1’, (8, 8))
    draw_0 = ImageDraw.Draw(image_0)
    draw_1 = ImageDraw.Draw(image_1)
    draw_0.line((2,3,2,6), fill=255)
    draw_0.line((3,2,3,7), fill=255)
    draw_0.line((4,3,4,6), fill=255)
    draw_0.line((1,3,3,1), fill=255)
    draw_0.line((4,0,5,0), fill=255)
    draw_1.line((5,3,5,6), fill=255)
    draw_1.line((4,2,4,7), fill=255)
    draw_1.line((3,3,3,6), fill=255)
    draw_1.line((6,3,4,1), fill=255)
    draw_1.line((3,0,2,0), fill=255)
    show_emotion(image_0, image_1)

def emotion_sad():
    image_0 = Image.new(‘1’, (8, 8))
    image_1 = Image.new(‘1’, (8, 8))
    draw_0 = ImageDraw.Draw(image_0)
    draw_1 = ImageDraw.Draw(image_1)
    draw_0.line((2,3,2,6), fill=255)
    draw_0.line((3,2,3,7), fill=255)
    draw_0.line((4,3,4,6), fill=255)
    draw_0.line((2,0,7,5), fill=255)
    draw_1.line((5,3,5,6), fill=255)
    draw_1.line((4,2,4,7), fill=255)
    draw_1.line((3,3,3,6), fill=255)
    draw_1.line((0,5,5,0), fill=255)
    show_emotion(image_0, image_1)

def emotion_silent():
    image_0 = Image.new(‘1’, (8, 8))
    draw_0 = ImageDraw.Draw(image_0)
    draw_0.line((0,4,7,4), fill=255)
    show_emotion(image_0, image_0)

def emotion_genial():
    image_0 = Image.new(‘1’, (8, 8))
    image_1 = Image.new(‘1’, (8, 8))
    draw_0 = ImageDraw.Draw(image_0)
    draw_1 = ImageDraw.Draw(image_1)
    draw_0.line((0,2,1,2), fill=255)
    draw_0.line((2,3,3,3), fill=255)
    draw_0.line((4,4,5,4), fill=255)
    draw_0.line((6,5,7,5), fill=255)
    draw_1.line((0,5,1,5), fill=255)
    draw_1.line((2,4,3,4), fill=255)
    draw_1.line((4,3,5,3), fill=255)
    draw_1.line((6,2,7,2), fill=255)
    show_emotion(image_0, image_1)

def emotion_love():
    image_0 = Image.new(‘1’, (8, 8))
    draw_0 = ImageDraw.Draw(image_0)
    draw_0.line((0,3,0,3), fill=255)
    draw_0.line((1,2,1,4), fill=255)
    draw_0.line((2,2,2,5), fill=255)
    draw_0.line((3,3,3,6), fill=255)
    draw_0.line((4,3,4,6), fill=255)
    draw_0.line((5,2,5,5), fill=255)
    draw_0.line((6,2,6,4), fill=255)
    draw_0.line((7,3,7,3), fill=255)
    show_emotion(image_0, image_0)

def emotion_giveup():
    image_0 = Image.new(‘1’, (8, 8))
    draw_0 = ImageDraw.Draw(image_0)
    draw_0.line((0,0,7,7), fill=255)
    draw_0.line((0,7,7,0), fill=255)
    show_emotion(image_0, image_0)

def emotion_oops():
    image_0 = Image.new(‘1’, (8, 8))
    image_1 = Image.new(‘1’, (8, 8))
    draw_0 = ImageDraw.Draw(image_0)
    draw_1 = ImageDraw.Draw(image_1)
    draw_0.line((1,4,6,4), fill=255)
    draw_0.line((2,3,4,1), fill=255)
    draw_0.line((2,5,4,7), fill=255)
    draw_1.line((1,4,6,4), fill=255)
    draw_1.line((3,1,5,3), fill=255)
    draw_1.line((3,7,6,5), fill=255)
    show_emotion(image_0, image_1)

def face_response_json(face):
    obj = {‘face’:face}
    return json.dumps(obj)

@route(‘/v1/robots/rapiro/control/face’)
def emotion():
    value = request.query.value
    if value == "none":
        emotion_none()
    elif value == "normal":
        emotion_normal()
    elif value == "happy":
        emotion_happy()
    elif value == "angry":
        emotion_angry()
    elif value == "sad":
        emotion_sad()
    elif value == "surprise":
        emotion_surprise_text()
    elif value == "silent":
        emotion_silent()
    elif value == "genial":
        emotion_genial()
    elif value == "love":
        emotion_love()
    elif value == "giveup":
        emotion_giveup()
    elif value == "oops":
        emotion_oops()
    else:
        emotion_none()
    return face_response_json(value)

#############################################################

display_0 = Matrix8x8.Matrix8x8(address=0x70, busnum=1)
display_1 = Matrix8x8.Matrix8x8(address=0x71, busnum=1)

display_0.begin()
display_1.begin()

emotion_silent()
time.sleep(2)
emotion_normal()
time.sleep(0.1)
emotion_silent()
time.sleep(0.1)
emotion_normal()
time.sleep(0.1)
emotion_silent()
time.sleep(0.1)
emotion_normal()

run(host='192.168.24.xxx', port=10080, debug=True)
いくつかいろんな表情を入れてますので、これを参考に新しい表情を作るのも楽しいかと思います。
さて、これでラピロが表情も取り戻してくれたので、最後に声を取り戻してもらおうと思います。

コメント
コメント一覧 (6件)
[…] 上の動画では、前に作ったコミュニケーション向けロボを使用していますので、ついでにLEDマトリクスでロボットが目覚めるような表情付けを行っています。表情付けのコードは、上のコードに対してこちらのコードを組み合わせてもらえば実現できます。 […]
いつも貴重な記事をありがとうございます。ロボットに興味を持ち始めた孫のために,記事を参考にRapiroをいじっています。
ひとつお伺いしたいのですが,おかげさまで同じマトリックスを用いてmatrix8x8_scroll.py,matrix8x8_scroll_sample.pyと表示には成功しましたが,スクロールの方向が記事とは異なりI2Cのピンを上に向けて右から左へではなく,ピンを左側としての表示となります。Rapiroへの取り付けに大きな影響はないと思いますが,原因についてお伺いできれば幸いです。よろしくお願いします。
Mr.Tigers様
ご覧いただきありがとうございます。一年半前の記事ですっかり内容を忘れてしまったのですが。。。ピンを左側にすると向かって右から左に流れるということは、スクロール方向がhorizonではなくverticalになっているということですね。スクロールが流れる方向は、新たに追加したhorizontal_multi_scroll関数内で座標を設定しているところ(例えば、(8 – x, 0, 8, 8)のように書かれているところ)で決まっているはずですので、おそらくhorizontal_multi_scroll関数内で複数ある座標設定のところのどこかが異なっているのではないかと思います。具体的にどこかを説明できれば良いのですが、あいにく今それを検証する環境と時間がなく、申し訳ありません。
hidaka_hiroji様
年月が経過した話題にもかかわらず,早々のご回答をありがとうございました。二つのマトリックスを隙間無くくっつける場合には問題となりますが,幸いRapiroでは多少の間隔がありますので,当面は横にして?設置してみることにします。また何かわかりましたらご教示ください。ありがとうございました。
[…] Dマトリクスの使い方については、こちらをご参照いただければと思います。 […]
[…] ということで、「今回搭載したジェスチャセンサと、前の動作とか表情づけを組み合わせるとこんなことができますよ」というデモです。 […]